Oracle WebLogic Server 12c: Creating a Basic Cluster
Creating a Cluster of Existing Servers
To create a cluster of existing managed servers, perform the following steps:
1. If the administration server of the domain is not already running, it needs to be started. To start it, in a Terminal window, navigate to the domain directory, and enter the command:
$ ./startWebLogic.sh

When prompted for a username and password, enter the credentials of the domain administrator.
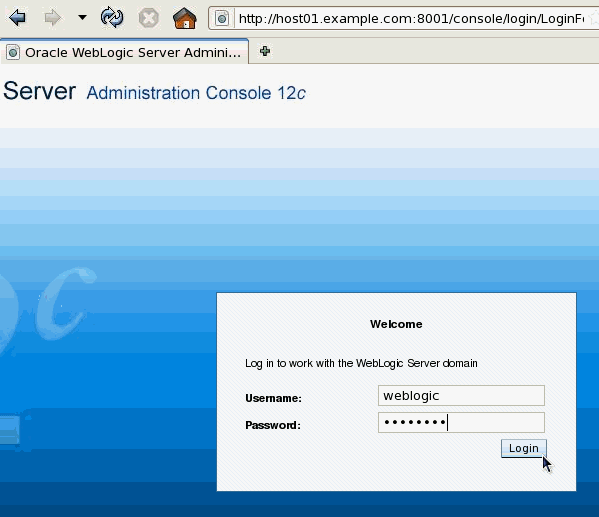
2. If any of the managed servers of the domain are running, shut them down. One way to do that is by using the administration console. Open a web browser and enter its URL:
http://hostname:port/console
In this tutorial, that is: http://host01.example.com:8001/console
Note: Use the host name and port of the administration server of your domain.
On the Welcome screen, log in using the Username and Password entered to start the administration server.
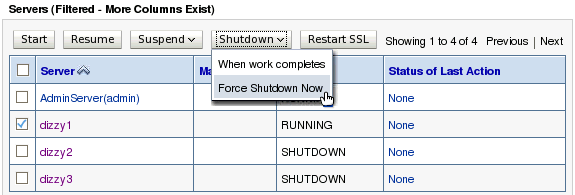
3. In the administration console, under Domain Structure, expand Environment (by clicking the + sign next to it). Then click Servers.
Under Summary of Servers, click the Control tab.

4. In the Servers table, select the check box for each managed server that is RUNNING. Click Shutdown, and in the drop-down list select Force Shutdown Now.
5. Click Yes to continue.
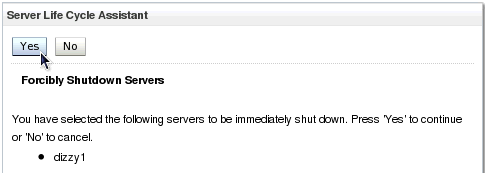
A message is displayed indicating that the server or servers are being shut down. In a few moments, refresh the browser and ensure the State of all managed servers is SHUTDOWN.
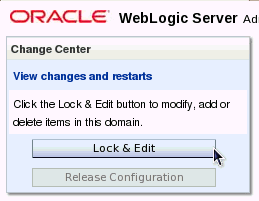
6. Creating a cluster is a change to the domain's configuration, so the configuration must first be locked. In the Change Center, click the Lock & Edit button.
7. In the Domain Structure area, under Environment, click Clusters. Above the Clusters table, click the New button.

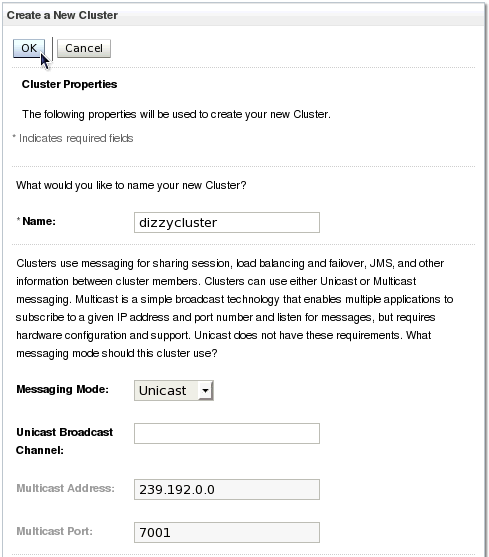
8. In the Create a New Cluster screen, for Name enter dizzycluster.
For Messaging Mode select Unicast.
Leave Unicast Broadcast Channel blank.
Then click OK.
Note: Because Unicast is selected, the two Multicast fields are disabled.
A message is displayed indicating the cluster was created successfully.
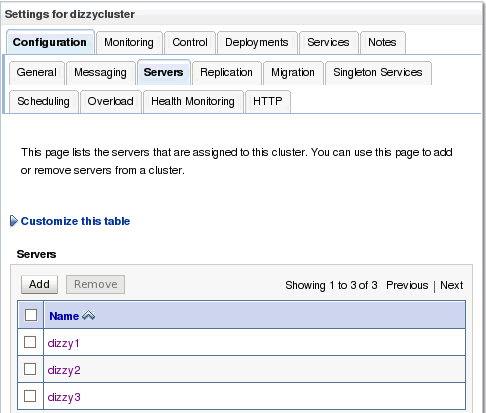
9. In the Clusters table, click the name of the new cluster, dizzycluster.
In the Settings for dizzycluster, click the Configuration tab, and the Servers subtab.
Then click the Add button.

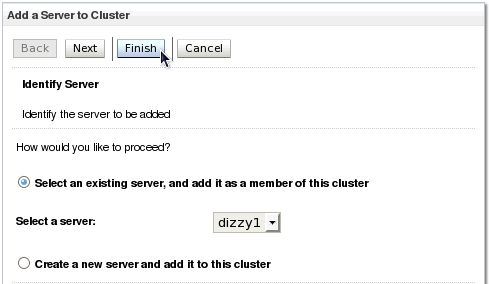
10. On the Add a Server to Cluster page, ensure that Select an existing server, and add it as a member of this cluster is selected.
Use the drop-down list to select one of the managed servers.
Then click the Finish button.
11. Repeat that process (click the Add button and use the drop-down list) to add the two remaining managed servers to the cluster.
12. In the Change Center click the Activate Changes button.

The message "All changes have been activated. No restarts are necessary." is displayed.
Starting the Clustered Servers
To start the managed servers that are now part of a cluster, perform the following steps:
1. In a new Terminal window, navigate to the domain directory, then cd into the bin subdirectory. Enter the command:
$ ./startManagedWebLogic.sh dizzy1 http://host01.example.com:8001
This runs the script to start the managed server named dizzy1. Also notice the argument that gives the URL of the domain's administration server:
http://host01.example.com:8001.
Note: Use the host name and port of the administration server of your domain.

When prompted for a username and password, enter the credentials of the domain administrator.
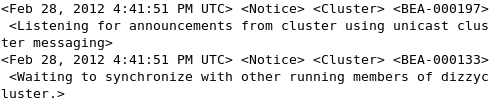
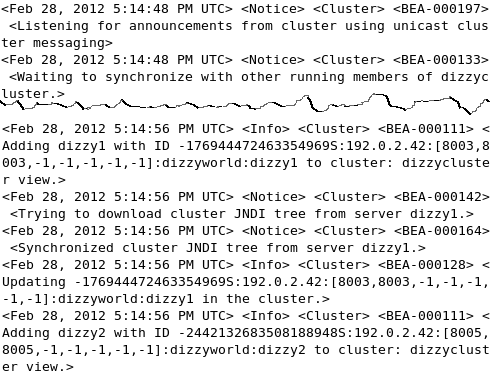
2. Watch the messages print out to the Terminal window. At some point, there will be a message indicating the server is listening for communication from the cluster. There will also be a message that the server is waiting to synchronize with the other servers in the cluster. Because the other servers have not started, it cannot synchronize with them yet.
Note: If the managed server's Standard Out Severity Level is not set to Notice or lower, these cluster log messages will not be shown in the Terminal window. Alternatively, use the administration console to view the contents of the server log file.
3. In two other Terminal windows, repeat this process, using the startManagedWebLogic.sh script to start the other two managed servers: dizzy2 and dizzy3.
Once again, watch the messages print out to the Terminal windows or look in the server logs to confirm that the servers joined the cluster successfully.
Note: If the managed server's Standard Out Severity Level is not set to Info or lower, some of these cluster log messages will not be shown in the Terminal window. To change the Standard Out Severity level, in the administration console select the server in the Servers table. In its settings, click the Logging tab, the Generalsubtab. Scroll down and click Advanced. In the Change Center, click Lock & Edit. Use the Severity level drop-down list under Standard out to select Info. Click Save. In the Change Center, click Activate Changes.
Alternatively, use the administration console to view the contents of the server log files.
Monitoring the Cluster
To monitor the cluster by using the WebLogic Server administration console, perform the following steps:
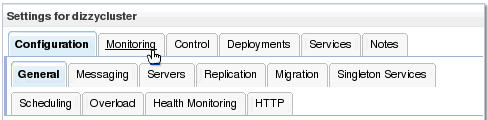
1. Return to the administration console. In Domain Structure, select Environment, then Clusters. In the Clusters table, click the name of the cluster, dizzycluster.
Under the Settings for dizzycluster, click the Monitoring tab.
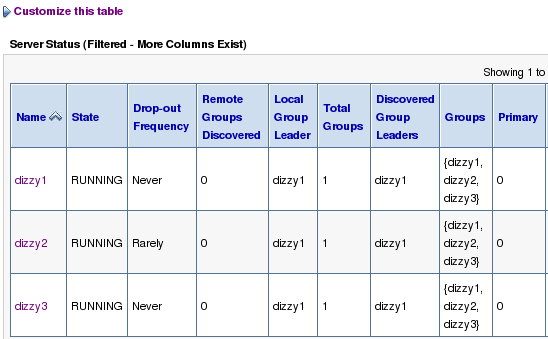
2. The table under the Summary subtab should indicate that all the three managed servers are currently participating in the cluster. Other cluster information is also displayed. To see even more information in the table, click the link Customize this table and add whatever columns to the table that you find interesting. Then click the Apply button.
Summary
In this tutorial, you learned how to:
Define a new cluster by using the administration console
Add servers to a cluster
Use server log messages to analyze a server's participation in a cluster
Use the administration console to monitor a cluster
Creating a Cluster of Existing Servers
To create a cluster of existing managed servers, perform the following steps:
1. If the administration server of the domain is not already running, it needs to be started. To start it, in a Terminal window, navigate to the domain directory, and enter the command:
$ ./startWebLogic.sh
When prompted for a username and password, enter the credentials of the domain administrator.
2. If any of the managed servers of the domain are running, shut them down. One way to do that is by using the administration console. Open a web browser and enter its URL:
http://hostname:port/console
In this tutorial, that is: http://host01.example.com:8001/console
Note: Use the host name and port of the administration server of your domain.
On the Welcome screen, log in using the Username and Password entered to start the administration server.
3. In the administration console, under Domain Structure, expand Environment (by clicking the + sign next to it). Then click Servers.
Under Summary of Servers, click the Control tab.
4. In the Servers table, select the check box for each managed server that is RUNNING. Click Shutdown, and in the drop-down list select Force Shutdown Now.
5. Click Yes to continue.
A message is displayed indicating that the server or servers are being shut down. In a few moments, refresh the browser and ensure the State of all managed servers is SHUTDOWN.
6. Creating a cluster is a change to the domain's configuration, so the configuration must first be locked. In the Change Center, click the Lock & Edit button.
7. In the Domain Structure area, under Environment, click Clusters. Above the Clusters table, click the New button.
8. In the Create a New Cluster screen, for Name enter dizzycluster.
For Messaging Mode select Unicast.
Leave Unicast Broadcast Channel blank.
Then click OK.
Note: Because Unicast is selected, the two Multicast fields are disabled.
A message is displayed indicating the cluster was created successfully.
9. In the Clusters table, click the name of the new cluster, dizzycluster.
In the Settings for dizzycluster, click the Configuration tab, and the Servers subtab.
Then click the Add button.
10. On the Add a Server to Cluster page, ensure that Select an existing server, and add it as a member of this cluster is selected.
Use the drop-down list to select one of the managed servers.
Then click the Finish button.
11. Repeat that process (click the Add button and use the drop-down list) to add the two remaining managed servers to the cluster.
12. In the Change Center click the Activate Changes button.
The message "All changes have been activated. No restarts are necessary." is displayed.
Starting the Clustered Servers
To start the managed servers that are now part of a cluster, perform the following steps:
1. In a new Terminal window, navigate to the domain directory, then cd into the bin subdirectory. Enter the command:
$ ./startManagedWebLogic.sh dizzy1 http://host01.example.com:8001
This runs the script to start the managed server named dizzy1. Also notice the argument that gives the URL of the domain's administration server:
http://host01.example.com:8001.
Note: Use the host name and port of the administration server of your domain.
When prompted for a username and password, enter the credentials of the domain administrator.
2. Watch the messages print out to the Terminal window. At some point, there will be a message indicating the server is listening for communication from the cluster. There will also be a message that the server is waiting to synchronize with the other servers in the cluster. Because the other servers have not started, it cannot synchronize with them yet.
Note: If the managed server's Standard Out Severity Level is not set to Notice or lower, these cluster log messages will not be shown in the Terminal window. Alternatively, use the administration console to view the contents of the server log file.
3. In two other Terminal windows, repeat this process, using the startManagedWebLogic.sh script to start the other two managed servers: dizzy2 and dizzy3.
Once again, watch the messages print out to the Terminal windows or look in the server logs to confirm that the servers joined the cluster successfully.
Note: If the managed server's Standard Out Severity Level is not set to Info or lower, some of these cluster log messages will not be shown in the Terminal window. To change the Standard Out Severity level, in the administration console select the server in the Servers table. In its settings, click the Logging tab, the Generalsubtab. Scroll down and click Advanced. In the Change Center, click Lock & Edit. Use the Severity level drop-down list under Standard out to select Info. Click Save. In the Change Center, click Activate Changes.
Alternatively, use the administration console to view the contents of the server log files.
Monitoring the Cluster
To monitor the cluster by using the WebLogic Server administration console, perform the following steps:
1. Return to the administration console. In Domain Structure, select Environment, then Clusters. In the Clusters table, click the name of the cluster, dizzycluster.
Under the Settings for dizzycluster, click the Monitoring tab.
2. The table under the Summary subtab should indicate that all the three managed servers are currently participating in the cluster. Other cluster information is also displayed. To see even more information in the table, click the link Customize this table and add whatever columns to the table that you find interesting. Then click the Apply button.
Summary
In this tutorial, you learned how to:
Define a new cluster by using the administration console
Add servers to a cluster
Use server log messages to analyze a server's participation in a cluster
Use the administration console to monitor a cluster


No comments:
Post a Comment